# Einrichten VM

# Installation Ubuntu 24.04.3 LTS (Minimal Server)

## 1. ISO herunterladen

Offizielle Quelle:  
👉 [https://ubuntu.com/download/server<span aria-hidden="true" class="ms-0.5 inline-block align-middle leading-none"><svg class="block h-[0.75em] w-[0.75em] stroke-current stroke-[0.75]" data-rtl-flip="" fill="currentColor" height="20" viewbox="0 0 20 20" width="20" xmlns="http://www.w3.org/2000/svg"><path d="M14.3349 13.3301V6.60645L5.47065 15.4707C5.21095 15.7304 4.78895 15.7304 4.52925 15.4707C4.26955 15.211 4.26955 14.789 4.52925 14.5293L13.3935 5.66504H6.66011C6.29284 5.66504 5.99507 5.36727 5.99507 5C5.99507 4.63273 6.29284 4.33496 6.66011 4.33496H14.9999L15.1337 4.34863C15.4369 4.41057 15.665 4.67857 15.665 5V13.3301C15.6649 13.6973 15.3672 13.9951 14.9999 13.9951C14.6327 13.9951 14.335 13.6973 14.3349 13.3301Z"></path></svg></span>](https://ubuntu.com/download/server)

- Variante: **Ubuntu Server 24.04.3 LTS**
- Image: `ubuntu-24.04.3-live-server-amd64.iso`

---

## 2. VM in Proxmox anlegen

1. In der Proxmox Web-GUI: **Create VM**
    
    
    - Name: `KI-VM`
    - ISO: `ubuntu-24.04.3-live-server-amd64.iso` (zuvor hochgeladen in Proxmox Storage)
    - System:
        
        
        - BIOS: **OVMF (UEFI)**
        - Machine: **q35**
        - Graphic Card: **none** (GPU wird durchgereicht)
    - Disks:
        
        
        - Speicher auf **Crucial NVMe 4 TB** oder System-SSD je nach Planung
        - Größe: mind. 250 GB (je nach Modellgrößen)
        - Cache: **Write back (unsafe)** (für Performance)
    - CPU:
        
        
        - 6 Cores (i5-13400 hat 10 → 6 reichen für KI-Workloads, Rest für Host)
        - Typ: **host**
    - RAM:
        
        
        - 32 GB (von 128 GB gesamt)
        - Ballooning: deaktivieren (konstante Zuweisung)
    - Netzwerk: **VirtIO (paravirtualized)**
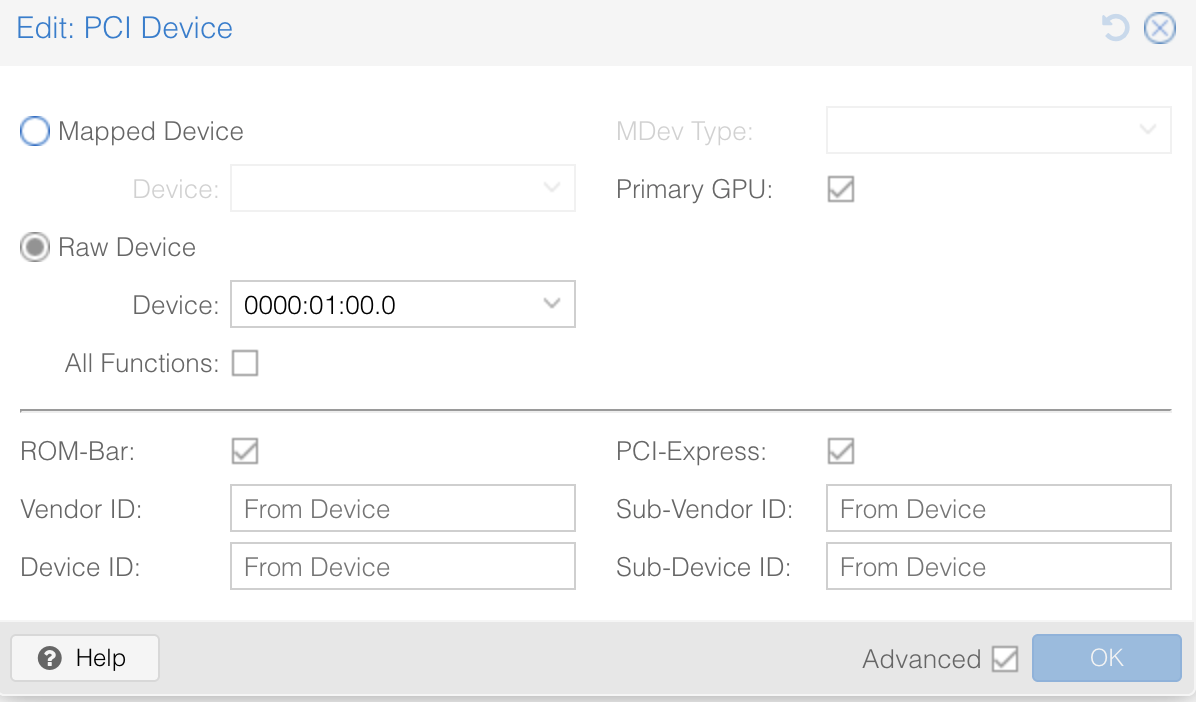
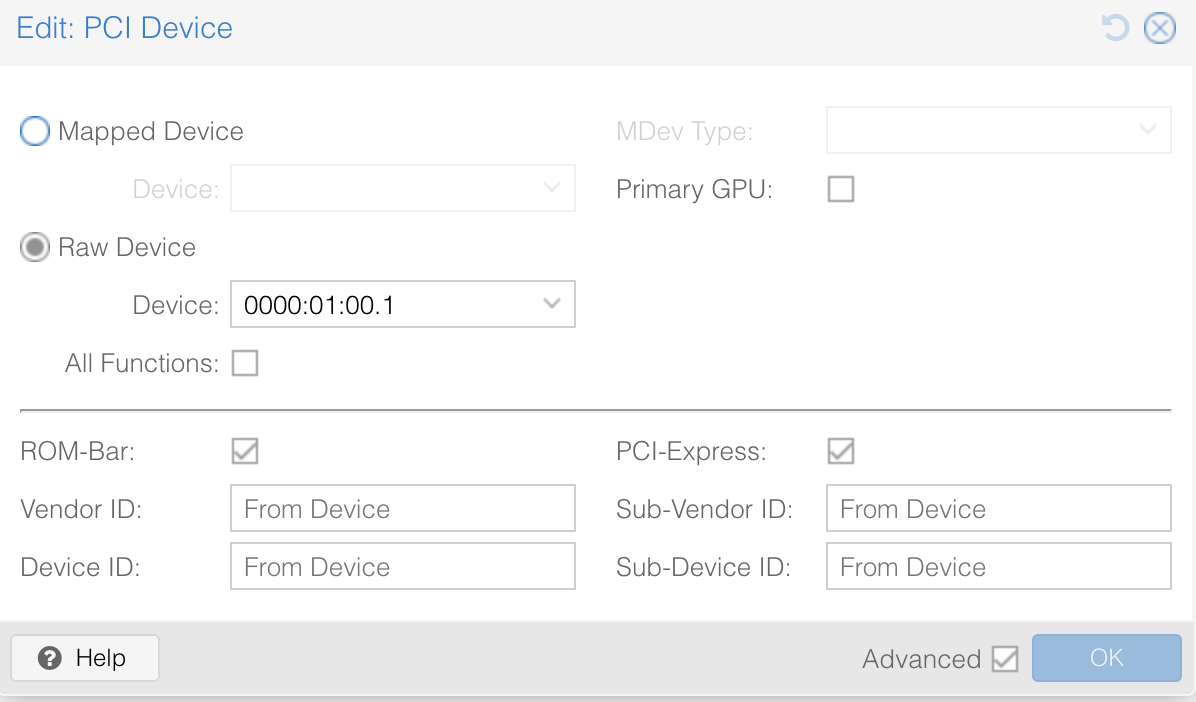
    - Hardware: **GPU &amp; Audio-Device** via PCI Passthrough hinzufügen (wie vorher eingerichtet).

---

## 3. Ubuntu Installation

1. Boot von ISO → Auswahl: **Install Ubuntu Server**
2. Sprache: `Deutsch` (oder Englisch, je nach Vorliebe)
3. Tastatur: `Deutsch`
4. Netzwerk:
    
    
    - `ens18` (VirtIO) automatisch via DHCP oder manuell konfigurieren
    - Empfehlung: **statische IP** für die VM (z. B. 192.168.33.200)
5. Storage:
    
    
    - Geführte Installation auf die virtuelle Disk
    - Partitionierung: Standard (LVM möglich, aber nicht zwingend)
6. Benutzer anlegen:
    
    
    - Username: `kiadmin`
    - Passwort: sicher setzen
    - SSH-Server installieren: **Ja**
7. Snap-Pakete: alle abwählen (nicht benötigt)
8. Installation starten → Neustart nach Abschluss

---

## 4. Erste Anpassungen nach der Installation

Nach Login per SSH oder Console:

### a) System aktualisieren

<div class="contain-inline-size rounded-2xl relative bg-token-sidebar-surface-primary" id="bkmrk-sudo-apt-update-%26%26-s"><div class="sticky top-9"><div class="absolute end-0 bottom-0 flex h-9 items-center pe-2"><div class="bg-token-bg-elevated-secondary text-token-text-secondary flex items-center gap-4 rounded-sm px-2 font-sans text-xs">  
</div></div></div><div class="overflow-y-auto p-4" dir="ltr">`sudo apt update && sudo apt upgrade -ysudo reboot`</div></div>### b) Nützliche Basis-Tools installieren

<div class="contain-inline-size rounded-2xl relative bg-token-sidebar-surface-primary" id="bkmrk-sudo-apt-install--y-"><div class="sticky top-9"><div class="absolute end-0 bottom-0 flex h-9 items-center pe-2"><div class="bg-token-bg-elevated-secondary text-token-text-secondary flex items-center gap-4 rounded-sm px-2 font-sans text-xs">  
</div></div></div><div class="overflow-y-auto p-4" dir="ltr">`sudo apt install -y htop ncdu git curl wget unzip zip tar net-tools iftop lsb-release pciutils`</div></div>### c) SSH konfigurieren

<div class="contain-inline-size rounded-2xl relative bg-token-sidebar-surface-primary" id="bkmrk-sudo-nano-%2Fetc%2Fssh%2Fs"><div class="sticky top-9"><div class="absolute end-0 bottom-0 flex h-9 items-center pe-2"><div class="bg-token-bg-elevated-secondary text-token-text-secondary flex items-center gap-4 rounded-sm px-2 font-sans text-xs">  
</div></div></div><div class="overflow-y-auto p-4" dir="ltr">`sudo nano /etc/ssh/sshd_config`</div></div>Empfohlen:

- `PermitRootLogin no`
- `PasswordAuthentication no` (falls SSH-Key genutzt wird)

Dann:

<div class="contain-inline-size rounded-2xl relative bg-token-sidebar-surface-primary" id="bkmrk-sudo-systemctl-resta"><div class="sticky top-9"><div class="absolute end-0 bottom-0 flex h-9 items-center pe-2"><div class="bg-token-bg-elevated-secondary text-token-text-secondary flex items-center gap-4 rounded-sm px-2 font-sans text-xs">  
</div></div></div><div class="overflow-y-auto p-4" dir="ltr">`sudo systemctl restart ssh`</div></div>### d) Zeitsynchronisation prüfen

<div class="contain-inline-size rounded-2xl relative bg-token-sidebar-surface-primary" id="bkmrk-timedatectl-set-time"><div class="sticky top-9"><div class="absolute end-0 bottom-0 flex h-9 items-center pe-2"><div class="bg-token-bg-elevated-secondary text-token-text-secondary flex items-center gap-4 rounded-sm px-2 font-sans text-xs">  
</div></div></div><div class="overflow-y-auto p-4" dir="ltr">`timedatectl set-timezone Europe/Berlintimedatectl status`</div></div>---

## 5. GPU-Treiber vorbereiten

Da die GPU durchgereicht wird, braucht die VM die NVIDIA-Treiber:

### a) Repository aktivieren

<div class="contain-inline-size rounded-2xl relative bg-token-sidebar-surface-primary" id="bkmrk-sudo-apt-install--y--1"><div class="sticky top-9"><div class="absolute end-0 bottom-0 flex h-9 items-center pe-2"><div class="bg-token-bg-elevated-secondary text-token-text-secondary flex items-center gap-4 rounded-sm px-2 font-sans text-xs">  
</div></div></div><div class="overflow-y-auto p-4" dir="ltr">`sudo apt install -y software-properties-commonsudo add-apt-repository ppa:graphics-drivers/ppa -ysudo apt update`</div></div>### b) NVIDIA-Treiber installieren

<div class="contain-inline-size rounded-2xl relative bg-token-sidebar-surface-primary" id="bkmrk-sudo-apt-install--y--2"><div class="sticky top-9"><div class="absolute end-0 bottom-0 flex h-9 items-center pe-2"><div class="bg-token-bg-elevated-secondary text-token-text-secondary flex items-center gap-4 rounded-sm px-2 font-sans text-xs">  
</div></div></div><div class="overflow-y-auto p-4" dir="ltr">`sudo apt install -y nvidia-driver-550 nvidia-utils-550`</div></div>### c) Neustart &amp; Test

<div class="contain-inline-size rounded-2xl relative bg-token-sidebar-surface-primary" id="bkmrk-nvidia-smi"><div class="sticky top-9"><div class="absolute end-0 bottom-0 flex h-9 items-center pe-2"><div class="bg-token-bg-elevated-secondary text-token-text-secondary flex items-center gap-4 rounded-sm px-2 font-sans text-xs">  
</div></div></div><div class="overflow-y-auto p-4" dir="ltr">`nvidia-smi`</div></div>→ sollte GPU-Daten (Modell RTX 5060 Ti, Treiber, CUDA-Version) anzeigen.

---

## 6. Optional: Basis-Optimierungen für KI-Workloads

- **Swappiness reduzieren** (damit RAM bevorzugt genutzt wird):
    
    <div class="contain-inline-size rounded-2xl relative bg-token-sidebar-surface-primary"><div class="sticky top-9"><div class="absolute end-0 bottom-0 flex h-9 items-center pe-2"><div class="bg-token-bg-elevated-secondary text-token-text-secondary flex items-center gap-4 rounded-sm px-2 font-sans text-xs">  
    </div></div></div><div class="overflow-y-auto p-4" dir="ltr">`<span class="hljs-built_in">echo</span> <span class="hljs-string">'vm.swappiness=10'</span> | sudo <span class="hljs-built_in">tee</span> -a /etc/sysctl.confsudo sysctl -p`</div></div>
- **Transparent Hugepages deaktivieren** (manchmal Performance-Gewinn bei LLMs):
    
    <div class="contain-inline-size rounded-2xl relative bg-token-sidebar-surface-primary"><div class="sticky top-9"><div class="absolute end-0 bottom-0 flex h-9 items-center pe-2"><div class="bg-token-bg-elevated-secondary text-token-text-secondary flex items-center gap-4 rounded-sm px-2 font-sans text-xs">  
    </div></div></div><div class="overflow-y-auto p-4" dir="ltr">`<span class="hljs-built_in">echo</span> never | sudo <span class="hljs-built_in">tee</span> /sys/kernel/mm/transparent_hugepage/enabled`</div></div>
- **ufw aktivieren** (Firewall, falls nicht durch Docker geregelt):
    
    <div class="contain-inline-size rounded-2xl relative bg-token-sidebar-surface-primary"><div class="sticky top-9"><div class="absolute end-0 bottom-0 flex h-9 items-center pe-2"><div class="bg-token-bg-elevated-secondary text-token-text-secondary flex items-center gap-4 rounded-sm px-2 font-sans text-xs">  
    </div></div></div><div class="overflow-y-auto p-4" dir="ltr">`sudo apt install ufw -ysudo ufw default deny incomingsudo ufw default allow outgoingsudo ufw allow sshsudo ufw <span class="hljs-built_in">enable</span>`</div></div>

Konfiguration GPU:

[![image.png](https://wiki.leibling.de/uploads/images/gallery/2025-09/scaled-1680-/Vh2lipGN4OUZOhh2-image.png)](https://wiki.leibling.de/uploads/images/gallery/2025-09/Vh2lipGN4OUZOhh2-image.png)

Konfiguration GPU-Audio:

[![image.png](https://wiki.leibling.de/uploads/images/gallery/2025-09/scaled-1680-/c0iaoUA79TeJfhOl-image.png)](https://wiki.leibling.de/uploads/images/gallery/2025-09/c0iaoUA79TeJfhOl-image.png)